Serial Dilution Protocol
Serial dilution is a crucial technique in various scientific disciplines, including microbiology, biochemistry, and pharmacology, due to its ability to accurately and precisely dilute substances to desired concentrations.
Background
By systematically diluting a stock solution multiple times in a stepwise manner, serial dilution allows researchers to create a range of concentrations suitable for experiments, assays, and analyses. This method is particularly important in microbiology for enumerating bacterial or viral concentrations, in biochemistry for determining enzyme kinetics or protein concentrations, and in pharmacology for drug potency assays and toxicity testing. Moreover, serial dilution enables the efficient use of limited quantities of expensive or rare substances while maintaining experimental accuracy and reproducibility, making it an indispensable tool in scientific research and laboratory practice.
Materials Needed
- Stock solution of the substance to be diluted
- Diluent (usually water or a buffer solution)
- Pipettes (with appropriate volume capacities)
- Microcentrifuge tubes or dilution tubes
- Pipette tips
- Mixing apparatus (vortex mixer or pipette for mixing)
Protocol
- Label your dilution tubes or microcentrifuge tubes according to the dilution series you plan to make, starting from the highest dilution to the lowest. Alternatively, dilutions can also be prepared in 96-well microplates.
- Prepare your diluent (water or buffer solution) in a clean container.
- Add the desired amount of diluent to the dilution tubes. The amounts will depend on your dilution factor and the final volume required.
- Using a pipette, transfer a known volume (usually a small amount) of the stock solution into the first dilution tube containing diluent. This will be your starting point for the dilution series. The volume of stock solution added depends on the desired dilution factor. For example, if you want to perform a 1:10 dilution, use 1 part of stock solution into 9 parts diluent.
- Mix the contents of the first dilution tube thoroughly to ensure uniform dilution.
- Using a clean pipette tip, transfer a known volume from the first dilution tube to the second dilution tube containing diluent. This dilution method should be consistently applied to all subsequent dilution tubes.
- Mix the contents of the second dilution tube thoroughly.
- Repeat steps 6-7 for subsequent dilutions until you have reached the desired dilution series.
- After completing the dilution series, you can use the final dilutions for further experiments or analysis.
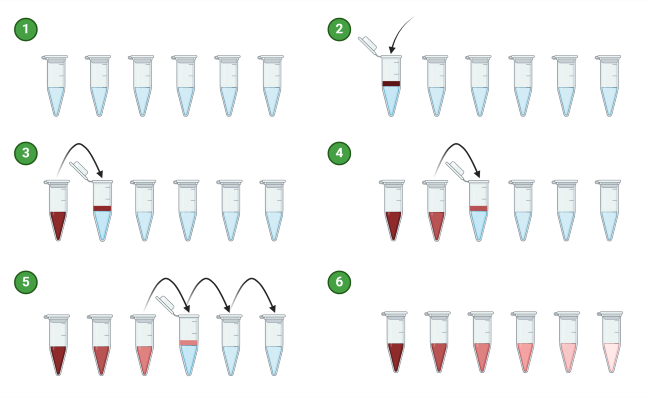
Step-by-Step Illustration
Tips and Tricks
- Consider When to Use Serial Dilutions: If you need to dilute a protein or chemical stock by 1000-fold or more, it is best to use some serial dilution. For example, if the protocol requires diluting a reagent 1000-fold in assay buffer, do not simply dilute 10 μl into 10 ml, as this may result in an excessive final volume that may not be required. Instead, dilute 10 μl into 90 μl of assay buffer, then perform a subsequent 100-fold dilution by adding 10 μl into 990 μl of assay buffer.
- Plan Your Dilution Series: Before starting, decide on the dilution factors and the number of dilutions required to achieve the desired concentrations. Also, consider the final volumes that will be required for your experiments. For ELISA standard curves, dilutions are typically done at 1:2. For inhibitor assay dilution curves, BPS Bioscience typically performs 1:3 dilutions. For endotoxin titration or other instances where the stock concentrations are high, dilutions at 1:10 are optimal.
- Use Proper Pipetting Techniques: Calibrate your pipettes regularly and use them correctly to ensure accurate volume measurements. Always use fresh pipette tips for each transfer to prevent cross-contamination between samples. Don’t try to pipette volumes that are too small (<1 μl), as this can lead to inaccuracies, unless you have a special pipette calibrated to handle sub-microliter volumes.
- Mix Thoroughly: After each dilution step, mix the contents of the tube thoroughly to ensure uniform distribution of the solute. Use a vortex mixer or gentle pipetting to mix without introducing air bubbles.
- Document Dilutions Carefully: Record all dilution steps, volumes transferred, and dilution factors accurately in your lab notebook. This documentation is crucial for reproducibility and troubleshooting potential issues.